

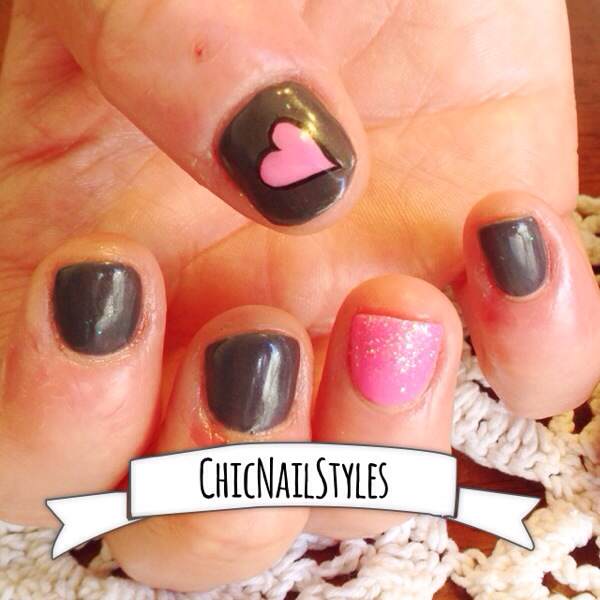
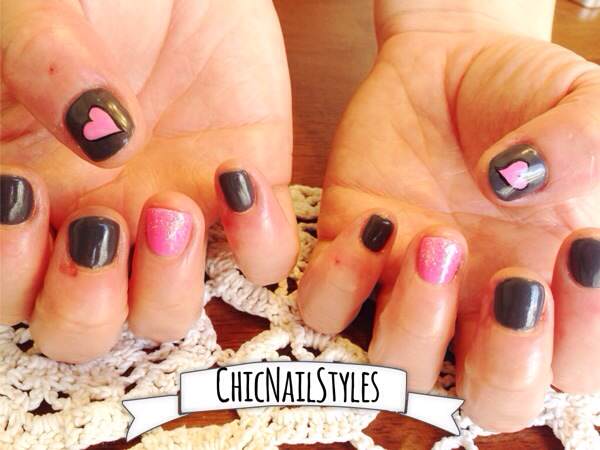
I love pink and gray together! It is such a cute color combination whether it’s on your nails or your outfit or your house! So when Jess (who I do trade with for my fabulous eyelash extensions!) wanted a pink and gray combo yesterday I was more than happy to oblige. I’ll list the instructions below with all products used…
Sassy and sweet 🙂
Get The Look!
Step One
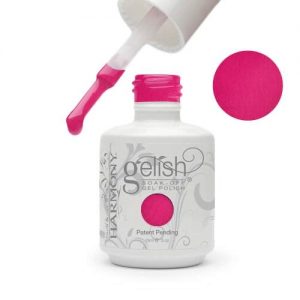
Do three color coats of Gelish JetSet (or your gray polish of choice) and Gelish Make You Blink Pink on the ring finger. Jet Set is one of my favorite gray gel polish’s ever, just to let you know! It applies perfectly and it’s the perfect charcoal gray color. If you’re using gel polish, cure each coat two minutes. If you’re using regular polish, let polish dry completely.
Step Two
Draw a WHITE heart on the thumb in the size and shape that you like. If your using gel polish cure two minutes. With regular polish let dry almost completely but it doesn’t need to be rock hard dry. After white heart is cured or dry, go over white heart with your bright pink polish. Any time you want a bright design over a dark polish always do a white base coat of the design first to really get the design to POP!
Step Three
With a fine artist brush, draw a black outline around the heart with black acrylic artist paint. Use a very light stroke and make sure not to pick up too much paint with your brush. It’s easier to add more paint if you need to than to take the paint off if you get too much. Let the black paint dry completely. While the black paint is drying, take loose LIGHT PINK glitter mixed with crystal hex pieces and a touch of silver glitter and apply it to the tip of the ring finger with a nail brush (I use my gel brush for this step). Continue to apply the glitter at the free edge of the ring finger until you get the desired consistency and then lightly drag the glitter about halfway down the nail bed with a nail brush until you have faded the glitter just the amount you like. Press the loose glitter down with your finger tip lightly to smooth it out as much as possible.
Step Four
Make sure the black paint outline is dry and apply a thin top coat over each nail. Do the glitter ring finger last so that you don’t spread the glitter around to the other nails or use a separate top coat for glitter nails. If you are using gel polish cure the top coat a full two minutes. If you are using regular top coat let the top coat dry. Once the top coat is cured or dried completely do ANOTHER top coat and cure for two minutes or dry. I do two gel polish top coats with glitter nails and when I use acrylic paint for artwork for two reasons. One, to smooth the loose glitter out as much as possible and two because the acrylic paint will sometimes wipe off when you remove the sticky layer if you only do one top coat.
Step Five
If you are using gel polish, remove the sticky layer with 99% alcohol. Apply cuticle oil to all fingers and rub in well. Tada! You are done! 🙂
Products I Recommend
Thank you so much for reading and please let me know if you have any questions!!! Don’t forget to sign up for my giveaway that ends this Thursday February 13! Click here to get signed up!
I hope you are having a great week!!! xoxo!
Tootles–Anna